Little Yellow Ducks Invade NY

Coworker Ducks

For the past 2 weeks I’ve been more than a little obsessed with The Little Yellow Duck Project. I’ve been crocheting little ducks like crazy and my son, husband, and I have now placed 34 ducks in NYC, Long Island, and around Westchester County.

It’s ridiculously fun. Sneaking around. Trying to leave a duck in a super crowded place without being noticed. Eagerly checking The Little Yellow Duck Project’s world map to see if any new ducks have been reported. The rush when we’ve had another duck on the map. The amazement that our ducks were the first ones reported in NY state. The shouts of joy when we realized that the 500th duck reported was one we had left!

Ducks about to hit the streets of NY

Ducks about to hit the streets of NY

My husband’s continued attempts have resulted in 0 of 14 ducks on the map. However, after leaving ducks on his coworker’s desks and discussing the project with them, he learned that one of them is about to donate a kidney in a few days. He didn’t feel it was right to push her to register it. She was doing more than her share for the cause.

So what is the cause? The Little Yellow Duck Project has two goals: to brighten up someone’s day by finding a little duck and to increase awareness and registration for organ, blood, and bone marrow donation. How is that personal? My friend Tania who I mentioned in my last post died earlier this year at the age of 41 while waiting for a heart transplant.

Little Yellow Duck with Tag

Little Yellow Duck with Tag

So what’s the deal with these ducks? There are a few official free patterns, but you can make any duck you like however you want to make it and stick a tag on it letting people know to take it home and that it’s part of The Little Yellow Duck Project with the website listed. I’ve used both the Just Ducky Lovey pattern and Filbert. Both are free patterns and work up in about an hour. I’ve found that Just Ducky Lovey is better for sticking in places, like slots of a bench if it’s windy. Filbert stands up and works great for flat places like picnic tables or the top of washing machines. The tags are available in multiple languages on the website and even include a place for you to name each duck.

While I’ve crocheted my ducks, there are also patterns for knitted and sewn ducks. People have also made ducks out of pom poms and have made bags with appliqued ducks on them.

This is an international initiative so no matter where you are, no matter what your medium, give it a shot. You just might make it on the map (and help to save a life in the process).

Ducks for The Little Yellow Duck Project

First Group of Ducks for The Little Yellow Duck Project

Little Yellow Duck

Filbert! as a Little Yellow Duck

Mallard variations of Just Ducky Lovey

Mallard variations of Just Ducky Lovey


Free Pattern: Supersized See My Stitches Scarf

Supersized See My Stitches Scarf

Supersized See My Stitches Scarf

Supersized Side View

Supersized Side View


One of the first patterns I favorited on Ravelry was Lorraine Hern’s Bionic Wrap Scarf (pattern available on Ravelry and My PDF Patterns). Well… when I was about to pay for the pattern, I realized you needed two needles and not a hook to make this scarf. It was a knit pattern, so much for that idea. Over the months, I’ve continued to love the oversized stitch look and have been drawn back to this scarf time and time again.

The Bionic Wrap Scarf was the inspiration behind my crocheted Supersized See My Stitches Scarf which I had a blast making and LOVE wearing. I have decided this is my favorite scarf and I want to make a zillion more. It’s very simple and a lot of fun.

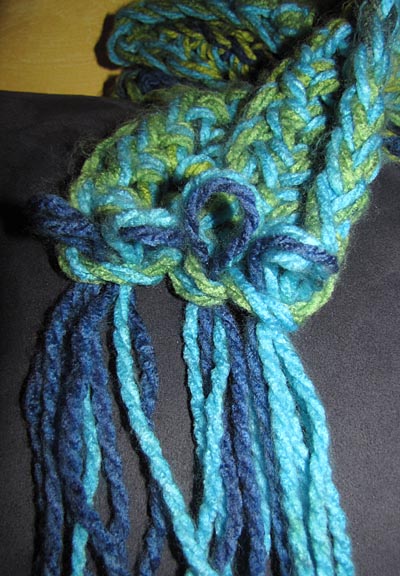
Supersized See My Stitches Scarf Closeup

Supersized See My Stitches Scarf Closeup

Materials:

2 skeins Charisma by Loops & Threads (218 yards Bulky weight yarn, a fun bright multi color yarn is highly recommended, uses exactly all the yarn)

16mm crochet hook

Abbreviations (US terms used):

Ch = Chain

SC = Single Crochet

HDC = Half Double Crochet

FHDC = Foundation Half Double Crochet

BLO = Back Loops Only

Supersized See My Stitches Scarf Pattern:

Hold 2 strands of yarn together throughout the entire pattern.

Leave a 6.5″-7″ tail when starting, this will become part of the fringe.

Row 1: Ch 2, 95 FHDC  (super easy alternative: you can Ch 97, then 95 HDC if you are afraid of FHDC, but I really recommend FHDC)

Row 2: Ch 2, HDC in BLO

Row 3-4: repeat Row 2

Finish off leaving a 6.5″-7″ tail.

Then add the fringe.

Fringe:

Cut 18 13” strands.
Incorporate starting and ending ends of the scarf into the fringe so you don’t have to weave them in.
Thread 4 sets of 2 strands on the side with the ends and 5 sets of 2 strands on the other end of the scarf, push the loop in, then bring all the loops together and pull all the ends through at one time so it makes one big knot and one big fringe on each end.

Fringe Step 1:  Pull Up Loops

Fringe Step 1: Pull Up Loops

Fringe Step 1: Another view

Fringe Step 1: Another view

Fringe Step 2: Get all loops together

Fringe Step 2: Get all loops together

Fringe Step 3: Pull all loops through at the same time

Fringe Step 3: Pull all loops through at the same time

Fringe Step 4: Pull tight

Fringe Step 4: Pull tight

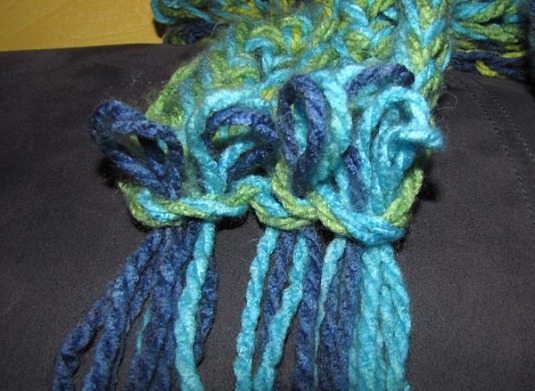
Final Fringe

Final Fringe

Uses EXACTLY all the yarn.

It’s a party of color.
Final Supersized Scarf

Hooked Holla Infinity Scarf Almost Done!

So I have not been ignoring my crocheting, but there has been a lot going on. Last week I ended my old job and this week I started a great new one. At the same time, I’ve been working on some new designs and in some cases, they’ve been taking a lot longer to work out than expected.

I just finished the crochet for the Hooked Holla Infinity Scarf and I am super excited to be in the home stretch of assembly. I am still hoping to have the pattern posted by the end of the month, probably this weekend.

I’ve been mulling the design of this scarf over in my head for a while now. I loved the Challah Infinity Scarf since I first came across the pattern on Ravelry, but alas, it is a knit pattern and I don’t do that. While I was tempted to purchase the knit pattern to see if I could just make a crocheted translation, the $7 price tag got me to get creative instead.

I was very inspired by the Challah Infinity Scarf and decided to make the Hooked Holla Infinity Scarf. Since it is a little knockoffy I chose to keep the pattern free, even after extensive reworking. It’s two ribbed strands with reversible post stitches between segments and one textured strand made of a griddle stitch variation. I worked the textured strand so many times I lost count. It was a long time before I was happy with the way the texture looked and worked with the ribbed strands. So after you make these three strands, you braid them together and sew the ends together to make it continuous. That’s the part I’m about to do (with fingers crossed).

After a lot of work and reworking, I hope this becomes the amazing scarf I know the Hooked Holla was meant to be.

Free Pattern: Window Pane Square 6″

Window Pane Squares

Window Pane Squares for Share a Square

This is the first square I freestyled. I was creating some squares for Share A Square, a bunch of people making squares that will magically turn into blankets for children with cancer, and realized it would be fun to start freestyling and to see where it took me. With a hook, yarn, and pattern free, I came up with the Window Pane Square. This is the pattern.

Using an H hook and worsted weight yarn this created a 6 inch square. I used a combination of Red Heart Soft and Red Heart Super Saver. If you need to make the square slightly larger, add more rows of SC or HDC as border rows.

Notes: You will join each row with a slip stitch and will not turn. Slip stitch to corner or finish off and add new yarn color at the corner at the end of each row. Repeat between () or [] where indicated.

Row 1: Ch4, Join with Slip Stitch

Window Pane Square - Row 2

Window Pane Square - Row 2

Row 2: Ch4, 15 TC into circle, join with slip stitch into top of Ch 4

Window Pane Square - Row 3

Window Pane Square - Row 3


Row 3: CH 1, (3 SC, CH 2, skip next stitch) 8 times, join with slip stitch into first SC

Window Pane Square - Row 4

Window Pane Square - Row 4

Row 4: (Ch 3, 2 DC, Ch 1, 3 DC, Ch 1) in the first Ch-sp, [ (3 DC, Ch 1) 1 time in the next Ch-sp, 2 times in the next Ch-sp] repeat around ending with 1 time, join with slip stitch into top of first Ch 3

Window Pane Square - Row 5

Window Pane Square - Row 5

Row 5: [[Ch 1, 1 SC, Ch 3, 1 SC (in ch-sp)], Ch3] repeat around with 2 SC in corner stitches


Window Pane Square - Row 6

Window Pane Square - Row 6

Row 6: Ch 6, skip ch-sp, [DC (in SC), Ch3 (skip ch-sp)] repeat around, make 2 in corners, join with slip stitch into third chain of first Ch 6

Window Pane Square - Row 6 Closeup

Window Pane Square - Row 6 Closeup


Window Pane Square - Row 7

Window Pane Square - Row 7

Row 7 : Ch 1, SC around (this will be 3 SC in Ch-Sp, 1 SC in DC, and 6 SC in corner Ch-sp), join with slip stitch in first SC

Window Pane Square - Row 8

Window Pane Square - Row 8

Row 8: Ch 1, SC around, 3SC in corners, join with slip stitch in first SC

Repeat Row 8 if you need to make the square a little larger.

Window Pane Square 2

Window Pane 4

Window Pane Square 1

For this year’s blankets, all squares need to be submitted by tomorrow, March 10, 2011, but they will start accepting squares for next year in August 2011. You can check the Ravelry group Share a Square 2010 for updates and to see if squares are being accepted yet.

Window Pane Squares 2

Free Pattern: Googly Thought TP Cozy to Celebrate NATCROMO

Yea! Celebrate! It’s NATCROMO! That’s National Crochet Month in case you hadn’t heard and there’s a party going on over at Ravelry to celebrate. A Scavenger Hunt is just one of the party games and for 17 points I made a toilet paper cozy, but not just any tp cozy, a Googly Thought TP Cozy.

Googly Thought TP Cozy with Original Googly Thought

Googly Thought TP Cozy with Original Googly Thought

So in case anyone else in the world is interested, here’s how I did it:

Free Pattern: Googly Thought TP Cozy

Materials:
Worsted weight yarn 150 yards is a very rough estimate. Cotton or acrylic for a “regular” one. The one pictured uses Caron Simply Soft 100% Acrylic, aproximately half the skein. Wool for a fuzzy brushed Googly Thought cozy.
Felt for the feet.
Satin Ribbon I used Weather Resistant Basic Floral Satin 5/8″ in white.
Fine Sharpie
40 mm Googly Eyes
Super Glue or Fabric Glue I used Gorilla Glue. Fabric Glue doesn’t always keep things stuck but Gorilla Glue does.
H/5mm Crochet Hook
Scissors
Needle
Thread
Sticky Back Velcro
I used the General Purpose 3.5″ x .75″ white strips and cut them in half.
Optional: Additional Novelty Ribbon I used a Black 5/8″ ribbon with little round hollogram rhinestone looking things on it.
Optional: Pinking Shears
Optional: Dog Hair Brush (if you’re using wool and want to make it fuzzy)

Abbreviations:
SC: Single Crochet
inc: an increase, 2 Single Crochet in one stitch

Notes:
You will be crocheting in the round and will not turn.
This is an amigurumi style TP Cozy.
Repeat what is listed between the () where instructed.

TP Cozy:

Row 1: 6 SC in a Magic Circle [6]

Row 2: inc around [12]

Row 3: inc around [24]

Row 4: (3 SC, inc) 6 times [30]

Row 5: (4 SC, inc) 6 times [36]

Row 6: SC around [36]

Row 7: (5 SC, inc) 6 times [42]

Row 8: SC around [42]

Row 9: (6 SC, inc) 6 times [48]

Row 10: SC around [48]

Row 11: (7 SC, inc) 6 times [54]

Row 12: SC around [54]

Row 13: (8 SC, inc) 6 times [60]

Row 14: (9 SC, inc) 6 times [66]

Row 15: SC around [66]

Row 16: (10 SC, inc) 6 times [72]

Rows 17-32: SC around [72]

Finish off and weave in ends.

Optional: If you are using wool and want a fuzzy cozy, brush the wool hard with the dog brush. If you’re looking for more info on this check out Roxycraft’s tutorial.

Antennae: Slip Stitch into the top of the ball, Ch 12, slip stitch back down the chain and back into the cozy. Repeat for other side. Pull ends through to the wrong side. I placed my antennae at rows 4-5 with 9 stitches between when counting on row 4. (if you choose to make a fuzzy cozy, you probably want to skip the antennae)

Feet:
Cut the felt feet into the shape of a heart. Mine measured 5.5″ high x 6.25″ wide.

TP feet and ribbons

Felt Feet and Ribbons

Your Words:
Cut the end of your ribbon with your scissors or pinking shears. Leave several inches for your tp cozy to sit on top of the ribbon, then start writing your message with your Sharpie. When done, cut the ribbon with your scissors or pinking shears. If your message is long, use two strips of ribbon. If you are using an extra novelty ribbon, figure out how long you want it and cut it too

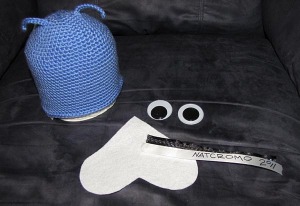
TP Cozy pieces before assembly

TP Cozy pieces before assembly

TP Cozy partially assembled

TP Cozy partially assembled

Assembly:

  1. Using fabric glue or super glue, glue the eyes to the cozy.
  2. Figure out where you will place the ribbon on the feet. Remember the Cozy will be on top of it, so the words should start beyond the edge of the feet. Stick one side of the Velcro on the feet and the other on the ribbon. This will allow you to change the messages on the cozy.
  3. Sew the just front part of the cozy to the feet with a regular needle and thread. Either tack it on or sew a few inches.
  4. Start the roll of toilet paper and stuff a little in the top of the cozy to make the head round.
  5. Insert the roll of toilet paper.

You’re done! Now come on over and join the NATCROMO party, you did just finish your first task in the Scavenger Hunt.

TP Cozy in Bathroom

Googly Thought TP Cozy in its natural surroundings


Thoughts on writing on ribbon:
While I purchased wider ribbon in 7/8″ and 1.5″, I was unsuccessful in my attempts to write on them. They were both Celebrate It brand Basic-Basic. Sharpies bled, my gel pen was M.I.A., and my tube of fabric paint just wasn’t working with me and kept getting uneven and ugly.

I finally used my Sharpie on the 5/8″ ribbon I had from the original Googly Thoughts and life was good again. That was Basic Basic Floral Satin Weather Resistant Ribbon. In other lessons learned, since it’s weather resistant, when I wrote on it with a gel pen, it wipes right off, so use a Sharpie.

I’m also thinking when it comes to writing on ribbon, I have a lot to learn. I’d love to hear some tips if you have had some success with it.

What’s a CAL?

So I’m in all these CAL groups (crochet-a-longs) on Ravelry. A bunch of people crocheting the same pattern (usually free) at the same time. You all talk about the pattern, yarn choice, ask questions, show your progress, get ideas from each other… it’s a lot fun and can get you more excited about your project. In my case, it can help to get me to focus on actually finishing a project as opposed to wandering off to a new one and ending up with yet another WIP (work in progress) or UFO (unfinished object) (depending on how you look at it).

Of course I’m behind in my CALs, especially the ones where I’m expected to finish something every month. I’m not sure if the Block a Month CAL is going to get me an afghan at the end of the year. At the rate I’m going I’m still thinking about making January’s squares.

Some of the others have really got my creative juices flowing and have pushed me to try new techniques like surface crochet and beaded crochet. I’ve made some very cool things as a result.

I’m currently part of the following Crochetalongs:

Some I’m much more active in than others… really gotta get going on my squares… Some I just plan on participating in sometime in the uncommitted future.

If you crochet, probably more so if you want to start crocheting and need some friends to help you out, you should find a CAL that you’re interested in and join the fun! You may just end up with a very cool FO (finished object) that you’d never thought of making.

Why Does It Take So Long For My Post to Show Up Anxiety

I’m a big fan of Ravelry. You will never find me on Facebook. You will find me on Ravelry at all sorts of times I shouldn’t be there.

I scour every crochet pattern posted for a potential future project.

I know every project posted in half the groups I’m in.

I bask in the glory of another heart being added to my projects like a teacher has given me another gold star.

The hour it takes for new blog posts to show up and wait to be associated with projects is painful for me. I refresh and refresh, like it will make things go faster. It does not.

Yesterday at 74 minutes, I finally went and ate breakfast.

Once I can finally tell Ravelry what projects I’ve been blogging about, I can get on with the rest of my day. I’m back to judging patterns for future potential, browsing group projects, and checking for new hearts… oh yeah and getting my son ready for school, getting ready for work and all that other fun stuff too. Real life does kick in every now and then.

Not THAT Kind of Hooker… moron

This weekend, I read the funniest story on Ravelry.com (THE knitting and crochet social website in case you didn’t know). A woman was crocheting in a restaurant reading a pattern from a book when the waitress told her they were getting complaints about what she was reading and they “don’t allow that kind of reading material in our establishment”. A customer then yelled at her, “People like YOU shouldn’t have children, its disgusting!” She was reading the pattern from the book Stitch and Bitch: The Happy Hooker.

Since then, some have proposed a Hooker Day be established where crocheters everywhere go out into public yarn, hook, and questionably titled pattern book in hand to show the world that we are free to hook wherever we want.

It just so happens that I bought The Happy Hooker last weekend and left it on the table the other day. My husband saw it and started to question me about it. I guess he thought it was a porno crochet book that I had left lying around for our 4 year old to peruse. Hide the book! Don’t let him see the bunny slippers pattern!

That made the woman’s restaurant encounter just that much funnier.

Inspired by one woman’s hysterical public display of crochet and an attempt to confuse my husband, I have named this blog Hookers Don’t Bite. No, I’m not THAT kind of hooker… moron.

Categories