Crochet Video Tutorial: RSC and RHDC

This video shows how to do the special stitches RSC, Raised Single Crochet, and RHDC, Raised Half Double Crochet used in the infinity scarf Sugared Ribs and the hat No More Snow! as well as several other patterns on HookersDontBite.com.

If this video shows it is unavailable in Safety Mode, click the YouTube link at the bottom of the video and it should start to play directly on YouTube. (I don’t think YouTube likes the name of my blog)

Free Pattern: Snow No? a cowl

Snow no a cowlBefore I begin, let me say Happy NatCroMo! That’s right, it’s National Crochet Month, so get that hook out and join the party. Now, onto the cowl…

Snow No flat viewMonday the snow did me wrong. After a winter of hating the snow and fighting against it, I finally embraced it. Over a foot was on the way. School and work were sure to be closed. I looked forward to it. And then… it didn’t show up.

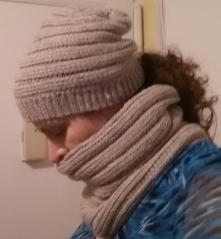
In anticipation, I made a matching cowl to No More Snow! a hat. While the snow was a no show, single digits did make a comeback and this cowl did get play this week. Similar to Spareribs, but a little smaller with ribbed edging that lets it be pulled over your nose or mouth, Snow No? will keep you super toasty against the brutal winds and ridiculous temperatures.

Here’s the pattern for Snow No! a cowl:

Materials:

300 yards of worsted weight yarn (I used around 1.5 skeins of Paton’s Classic Wool Worsted Weight )
H crochet hook (5.0 mm)
J crochet hook (6.0 mm)
Tapestry Needle

Abbreviations:

BLO: Work in the Back Loop Only.

BBL: Work in the Back Back Loop only. This is the loop BEHIND the back loop.
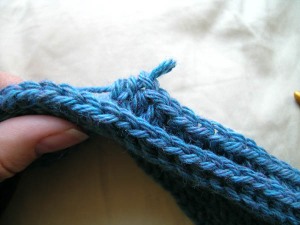
Top of work where you can see the work done in the BBL
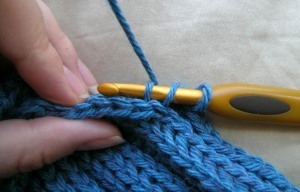
1 – For HDC in BBL, YO, insert hook into BBL
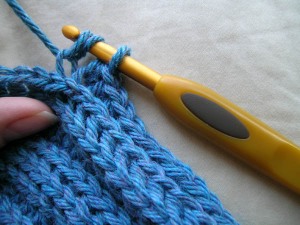
2 – YO, pull up a loop
3 – YO, pull through all loops on hook

Ch: Chain
FHDC:
Foundation Half Double Crochet
HDC: Half Double Crochet
RSC: Raised Single Crochet (special stitch). After using this stitch in the Fritillary Scarf, I did some research to see if there was an official name for this stitch. While I found the stitch mentioned in a few places, I did not see it named anywhere else, so I’ve used the name from the Fritillary Scarf (if it was in American terms). This is similar to a back post stitch. Insert hook from back to front, under top two loops of stitch, then from front to back, under top two loops of next stitch. Hook will be around the post. YO, pull up a loop, YO, pull through both loops on hook.
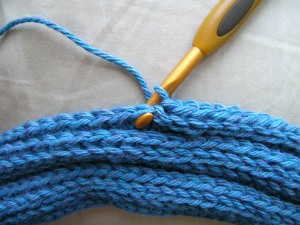
Raised SC: 1 – Back to front under top loops of stitch
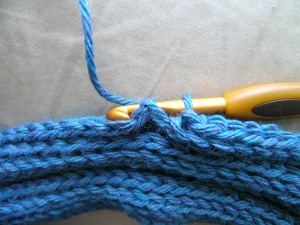
2 – Then from front to back under top loops of next stitch
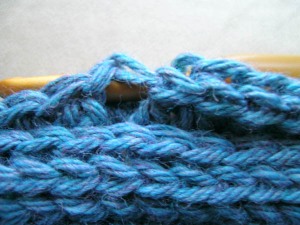
3 – Your hook will now be around the post. Now YO, pull up a loop.
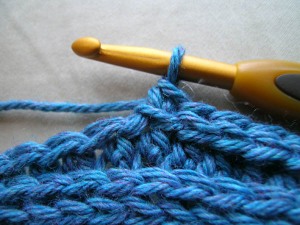
4 – YO, pull through both loops on hook, stitch is finished

RHDC: Raised Half Double Crochet (special stitch). Similar to the Raised Single Crochet, but this is the Half Double Crochet version. YO, insert hook from back to front, under top two loops of stitch, then from front to back, under top two loops of next stitch. Hook will be around the post. YO, pull up a loop, YO, pull through all loops on hook.
SC: Single Crochet
SS: Slip Stitch
Video tutorials for the special stitches used in this pattern can now be found on the Crochet Video Tutorial page.

Snow no cowlPattern:

Body of Cowl (with J hook):

The body of the cowl is worked in the round. You will be joining at the end of each round. Do not turn at the end of the round.

First Ch 1 at the beginning of the round does not count as a stitch.

Round 1: Ch 2 (does not count as a stitch), 99 FHDC, then for final FHDC you will connect the foundation row. Make sure the foundation row is straight, put the two ends side by side, yo, insert hook into top two loops of chain of working side, then insert hook from the back to front of two loops of chain of the other side, yo, pull through both sides and pull up a loop, yo, pull through all loops on hook, ss to connect to top part of stitch. (100)

Round 2: Ch 1 (does not count as a stitch), RSC in each stitch around, SS to connect to top of first stitch (100)

Round 3: Ch 1, RHDC in each stitch around, SS to connect to top of first stitch (100)

Round 4: Ch 1, HDC in BBL of each stitch around, SS to connect to top of first stitch (100)

Round 5-22: Repeat Rounds 2-4 six more times

Round 23-24: Repeat Rounds 2-3 one more time

Round 25: Ch 1, SC in BBL of each stitch around, SS to connect to top of first stitch (100)

Do not finish off. The body of the cowl is done. Now for the edging.

Edging of Cowl (with H hook):

You will be turning at the end of each row.
Be sure to count stitches as you go. It is easy to lose stitches if you don’t.
Keep your tension VERY loose.
You’ll want to use something to pick up the first and last stitches of each row. I used the eyehole side of a yarn needle.

Row 1: Continuing where you finished the body of the cowl, change to your H hook, Ch 7, turn. (7)

Row 2: Ch 1, SS in BLO of second Ch from hook, SS in BLO of each stitch, SS through both loops of foundation row (you should be on the wrong side), turn. (7)

Row 3: Skip SS in foundation row, SS in BLO of each stitch, turn. (7)

Row 4: Ch 1, SS in BLO of each stitch, SS through both loops of foundation row for 2 stitches, turn. (7)

Row 5: Skip 2 SS in foundation row, SS in BLO of each stitch, turn. (7)

Row 6: Ch 1, SS in BLO of each stitch, SS through both loops of foundation row, turn. (7)

Repeat Rows 3-6 until you meet up with the beginning, ending with either Row 4 or 6.

For the final row that connects the two sides, hold the two wrong sides together, turn. SS through both sides of work, BLO on side facing you, FLO on other side, FO.

Now you’ll work the other side of the ribbing.

Row 1: Still using your H hook, with the wrong side facing you, join yarn in foundation row with a SS, Ch 7, turn. (7)

Row 2: Ch 1, SS in BLO of second Ch from hook, SS in BLO of each stitch, SS through both loops of foundation row (you should be on the wrong side), turn. (7)

Row 3: Skip SS in foundation row, SS in BLO of each stitch, turn. (7)

Row 4: Ch 1, SS in BLO of each stitch, SS through both loops of foundation row for 2 stitches, turn. (7)

Row 5: Skip 2 SS in foundation row, SS in BLO of each stitch, turn. (7)

Row 6: Ch 1, SS in BLO of each stitch, SS through both loops of foundation row, turn. (7)

Repeat Rows 3-6 until you meet up with the beginning, ending with either Row 4 or 6.

For the final row that connects the two sides, hold the two wrong sides together, turn. SS through both sides of work, BLO on side facing you, FLO on other side, FO.

Weave in ends.

Please note this pattern is for personal use only. Please do not sell finished items from this pattern.

Free Pattern: Spareribs – A Cowl

Spareribs - A Cowl

While I’m a big fan of the infinity scarf worn doubled, I love the feel of this shorter, wider shape. It’s a fun, warm hug of yarn around your neck!

Spareribs is the perfect cowl to take on this nasty winter. It matches Worm on a Hook and No More Snow! a hat, Spareribs is inspired by several similar looking knit patterns: Jane Richmond’s Welted Cowl, Churchmouse Yarns and Teas’ Welted Cowl & Infinity Loop, and of course Wurm done as a cowl. If you’re neck is in need of a warm yarn hug, give it a shot.

Spareribs and No More Snow

Here’s the pattern for Spareribs – A Cowl:

Materials:

375 yards of worsted weight yarn (I used around 1.7 skeins of Paton’s Classic Wool Worsted Weight )
J crochet hook (6.0 mm)
Tapestry Needle


Abbreviations:

BBL: Work in the Back Back Loop only. This is the loop BEHIND the back loop.

Top of work where you can see the work done in the BBL
1 – For HDC in BBL, YO, insert hook into BBL
2 – YO, pull up a loop
3 – YO, pull through all loops on hook

Ch: Chain

FHDC: Foundation Half Double Crochet

HDC: Half Double Crochet

RSC: Raised Single Crochet (special stitch). After using this stitch in the Fritillary Scarf, I did some research to see if there was an official name for this stitch. While I found the stitch mentioned in a few places, I did not see it named anywhere else, so I’ve used the name from the Fritillary Scarf (if it was in American terms). This is similar to a back post stitch. Insert hook from back to front, under top two loops of stitch, then from front to back, under top two loops of next stitch. Hook will be around the post. YO, pull up a loop, YO, pull through both loops on hook.

Raised SC: 1 – Back to front under top loops of stitch
2 – Then from front to back under top loops of next stitch
3 – Your hook will now be around the post. Now YO, pull up a loop.
4 – YO, pull through both loops on hook, stitch is finished

RHDC: Raised Half Double Crochet (special stitch). Similar to the Raised Single Crochet, but this is the Half Double Crochet version. YO, insert hook from back to front, under top two loops of stitch, then from front to back, under top two loops of next stitch. Hook will be around the post. YO, pull up a loop, YO, pull through all loops on hook.

SS: Slip Stitch
Video tutorials for the special stitches used in this pattern can now be found on the Crochet Video Tutorial page.

Pattern:

Spareribs CowlThe body of the cowl is worked in the round. You will be joining at the end of each round. Do not turn at the end of the round.

First Ch 1 at the beginning of the round does not count as a stitch.

Round 1: Ch 2 (does not count as a stitch), 105 FHDC, then for final FHDC you will connect the foundation row. Make sure the foundation row is straight, put the two ends side by side, yo, insert hook into top two loops of chain of working side, then insert hook from the back to front of two loops of chain of the other side, yo, pull through both sides and pull up a loop, yo, pull through all loops on hook, ss to connect to top part of stitch. (106)

Round 2: Ch 1 (does not count as a stitch), RSC in each stitch around, SS to connect to top of first stitch (106)

Round 3: Ch 1, RHDC in each stitch around, SS to connect to top of first stitch (106)

Round 4: Ch 1, HDC in BBL of each stitch around, SS to connect to top of first stitch (106)

Round 5-28: Repeat Rounds 2-4 eight more times

Round 29-30: Repeat Rounds 2-3

Round 31: Ch 1, SC in BBL of each stitch around, SS to connect to top of first stitch (106)

Round 32: Turn, you are now working on the wrong side, SS around to tighten up the last row, SS to connect to top of first stitch (106)

FO and weave in the ends. Steam block to relax the yarn. This cowl done in Paton’s Classic Wool was CRAZY stiff before blocking. Paton’s Classic Wool also really softens up when you wet block it, so if steaming is still too stiff for you, wet block it.

Please note this pattern is for personal use only. Please do not sell finished items from this pattern.

Free Pattern: No More Snow! a hat

No More Snow! a hat

No More Snow! a hat

It cannot possibly be snowing again. But it is.

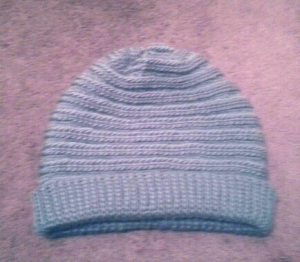
To vent my frustration I made another hat. A cross between Big Worm and Worm on a Hook, No More Snow! is a little larger than Worm on a Hook without the taper rows and with a smaller slip stitch ribbed edge than Big Worm. No More Snow! probably ended up to be the closest of the three hat patterns to Wurm.

Here’s the pattern for No More Snow! (and I mean it):

No More Snow Crocheted HatMaterials:

275 yards of worsted weight yarn (I used around 1.25 skeins of Paton’s Classic Wool Worsted Weight )
H crochet hook (5.0 mm)
J crochet hook (6.0 mm)
Tapestry Needle

Abbreviations:

BLO: Work in the Back Loop Only.

BBL: Work in the Back Back Loop only. This is the loop BEHIND the back loop.

Top of work where you can see the work done in the BBL
1 – For HDC in BBL, YO, insert hook into BBL
2 – YO, pull up a loop
3 – YO, pull through all loops on hook

Ch: Chain
FHDC:
Foundation Half Double Crochet
HDC: Half Double Crochet
RSC: Raised Single Crochet (special stitch). After using this stitch in the Fritillary Scarf, I did some research to see if there was an official name for this stitch. While I found the stitch mentioned in a few places, I did not see it named anywhere else, so I’ve used the name from the Fritillary Scarf (if it was in American terms). This is similar to a back post stitch. Insert hook from back to front, under top two loops of stitch, then from front to back, under top two loops of next stitch. Hook will be around the post. YO, pull up a loop, YO, pull through both loops on hook.

Raised SC: 1 – Back to front under top loops of stitch
2 – Then from front to back under top loops of next stitch
3 – Your hook will now be around the post. Now YO, pull up a loop.
4 – YO, pull through both loops on hook, stitch is finished

RHDC: Raised Half Double Crochet (special stitch). Similar to the Raised Single Crochet, but this is the Half Double Crochet version. YO, insert hook from back to front, under top two loops of stitch, then from front to back, under top two loops of next stitch. Hook will be around the post. YO, pull up a loop, YO, pull through all loops on hook.
HDC2TOG in BBL: Half Double Crochet 2 Together in Back Back Loop
SS: Slip Stitch
Video tutorials for the special stitches used in this pattern can now be found on the Crochet Video Tutorial page.

Closeup of No More Snow! a hatBack of No More Snow HatPattern:

Pattern is written for an adult size hat. Notes are included to adjust for child size hat.

Body of Hat (with J hook):

The body of the hat is worked in the round. You will be joining at the end of each round. Do not turn at the end of the round.

First Ch 1 at the beginning of the round does not count as a stitch.

For a Child size hat, start with a foundation row of 78 stitches.

To make the hat smaller or larger than the pattern, you can just add more or less stitches to the foundation row and do more or less repeats of rounds 2-4.

Round 1: Ch 2 (does not count as a stitch), 83 FHDC, then for final FHDC you will connect the foundation row. Make sure the foundation row is straight, put the two ends side by side, yo, insert hook into top two loops of chain of working side, then insert hook from the back to front of two loops of chain of the other side, yo, pull through both sides and pull up a loop, yo, pull through all loops on hook, ss to connect to top part of stitch. (84)

Round 2: Ch 1 (does not count as a stitch), RSC in each stitch around, SS to connect to top of first stitch (84)

Round 3: Ch 1, RHDC in each stitch around, SS to connect to top of first stitch (84)

Round 4: Ch 1, HDC in BBL of each stitch around, SS to connect to top of first stitch (84)

Round 5-22: Repeat Rounds 2-4 six more times

Round 23-24: Repeat Rounds 2-3

Round 25: Ch 1, HDC2TOG in BBL of each stitch around, SS to connect to top of first stitch (42)

FO leaving long tail. Weave the tail in and out of each stitch of the last round and pull tight to close. Stitch a few stitches to secure and close up opening.

The body of the hat is done. Now for the edging.

Edging of hat (with H hook):

You will be turning at the end of each row.
Be sure to count stitches as you go. It is easy to lose stitches if you don’t.
Keep your tension VERY loose.
You’ll want to use something to pick up the first and last stitches of each row. I used the eyehole side of a yarn needle.
Upon request, a video of the edging is now available.

For a Child size hat, Ch 6 instead of 8.

Row 1: With the wrong side facing you, join yarn in foundation row with a SS, Ch 8, turn. (8)

Row 2: Ch 1, SS in BLO of second Ch from hook, SS in BLO of each stitch, SS through both loops of foundation row (you should be on the wrong side), turn. (8)

Row 3: Skip SS in foundation row, SS in BLO of each stitch, turn. (8)

Row 4: Ch 1, SS in BLO of each stitch, SS through both loops of foundation row for 2 stitches, turn. (8)

Row 5: Skip 2 SS in foundation row, SS in BLO of each stitch, turn. (8)

Row 6: Ch 1, SS in BLO of each stitch, SS through both loops of foundation row, turn. (8)

Repeat Rows 3-6 until you meet up with the beginning, ending with either Row 4 or 6.

For the final row that connects the two sides, hold the two wrong sides together, turn. SS through both sides of work, BLO on side facing you, FLO on other side, FO.

Weave in ends.

Please note this pattern is for personal use only. Please do not sell finished items from this pattern.

Free Pattern: Big Worm – A Hooked Hat

Big Worm - A Hooked Hat

Big Worm – A Hooked Hat

Big Worm is a big slouchy version of Worm on a Hook with a rolled up edging, and yes Friday is one of my favorite movies. Big Worm also has a 2 row rib instead of the 3 row rib in Worm on a Hook and more contrast between rows. I apologize in advance for using Slip Stitches for the ribbed edging. After making Doris Chan’s Sash-A belt for my Shannon cardigan a few years ago, I swore of Slip Stitches forever. A few days ago I started Shirley MacDonald’s Dappled Mitts and kept hating the technique, but loved the results. I tried several different types of ribbing for the edging of this hat and hands down the slip stitches worked the best. So… sorry.

Here’s the pattern for Big Worm:

Big Worm - A Hooked Hat

Materials:

330 yards of worsted weight yarn (I used around 1.75 skeins of Vickie Howell Sheep(ish) )
J crochet hook (6.0 mm)
Tapestry Needle
Optional: Mechanical pencil with no lead or something else to pick up stitches, can use Tapestry Needle

Abbreviations:

BLO: Work in the Back Loop Only.
BBL:
Work in the Back Back Loop only. This is the loop BEHIND the back loop.

Top of work where you can see the work done in the BBL

Working in the BBL


Ch: Chain
DC: Double Crochet
DC2TOG in BBL:
Double Crochet 2 Together in Back Back Loops
FHDC:
Foundation Half Double Crochet
FLO: Front Loop Only
RHDC:
Raised Half Double Crochet (special stitch). Similar to the Raised Single Crochet (photo tutorial available), but this is the Half Double Crochet version. YO, insert hook from back to front, under top two loops of stitch, then from front to back, under top two loops of next stitch. Hook will be around the post. YO, pull up a loop, YO, pull through all loops on hook.
RHDC2TOG: Raised Half Double Crochet 2 Together (special decrease stitch). YO, insert hook from back to front, under top two loops of stitch, then from front to back, under top two loops of next stitch. Hook will be around the post. YO, pull up a loop, YO, insert hook from back to front, under top two loops of stitch, then from front to back, under top two loops of next stitch. Hook will be around the post. YO, pull up a loop,YO, pull through all loops on hook.
SS: Slip Stitch

Video tutorials for the special stitches used in this pattern can now be found on the Crochet Video Tutorial page.

Pattern:

Body of Hat:

The body of the hat is worked in the round. You will be joining at the end of each round. Do not turn at the end of the round. First Ch 1 at the beginning of the round does not count as a stitch.

Round 1: Ch 2 (does not count as a stitch), 84 FHDC, then for final FHDC you will connect the foundation row. Make sure the foundation row is straight, put the two ends side by side, yo, insert hook into top two loops of chain of working side, then insert hook from the back to front of two loops of chain of the other side, yo, pull through both sides and pull up a loop, yo, pull through all loops on hook, ss to connect to top part of stitch. (85)

Round 2: Ch 1 (does not count as a stitch), RHDC in each stitch around, SS to connect to top of first stitch (85)

Round 3: Ch 1, DC in BBL of each stitch around, SS to connect to top of first stitch (85)

Round 4-19: Repeat Rounds 2-3 eight more times

Round 20: Repeat Round 2

Round 21: Ch 1, DC2Tog in BBL around to last stitch, DC in BBL for last stitch.

FO leaving long tail. Weave the tail in and out of each stitch of the last round and pull tight to close. Stitch a few stitches to secure and close up opening.

The body of the hat is done. Now for the edging.

Edging of hat:

You will be turning at the end of each row. Be sure to count stitches as you go. It is easy to lose stitches if you don’t. Keep your tension VERY loose. You’ll want to use something to pick up the first and last stitches of each row. It will make life MUCH easier. I used the tip of a mechanical pencil with no lead. You can use the eyehole side of a yarn needle.

Row 1: With the right side facing you, join yarn in foundation row with a SS, Ch 15, turn. (15)

Row 2: Ch 1, SS in BLO of second Ch from hook, SS in BLO of each stitch, SS through both loops of foundation row, turn. (15)

Row 3: Skip SS in foundation row, SS in BLO of each stitch, turn. (15)

Row 4: Ch 1, SS in BLO of each stitch, SS through both loops of foundation row, turn. (15)

Row 5: Skip SS in foundation row, SS in BLO of each stitch, turn. (15)

Row 6: Ch 1, SS in BLO of each stitch, SS through both loops of foundation row for 2 stitches, turn. (15)

Row 7: Skip 2 SS in foundation row, SS in BLO of each stitch, turn. (15)

Row 8: Ch 1, SS in BLO of each stitch, SS through both loops of foundation row, turn. (15)

Repeat Rows 3-8 until you meet up with the beginning, ending with a SS into the foundation row.

For the final row that connects the two sides, hold the two right sides together, turn. SS through both sides of work, BLO on side facing you, FLO on other side, FO.

Weave in ends.

Please note this pattern is for personal use only. Please do not sell finished items from this pattern.

Free Pattern: Worm on a Hook – A Hat

Worm on a Hook - The Hat

Worm on a Hook – The Hat

It’s been a rough winter. A few weeks ago when the single digit weather started kicking in here in the NY area, I started having flashbacks to my college days in Chicago and as I did back then, I began to pile on the layers.

In the search for all the winter gear I could get my hands on, one day I borrowed my husband’s hat. My head had the same revelation my neck had when I started making and wearing scarves a few years ago. It was so warm. I had to have me one of these hats!

Looking around at hat patterns, I really liked the super popular knit hat pattern Wurm and thought Sugared Ribs could totally be turned into a Wurm inspired hat.

So here’s my Wurm inspired crocheted hat pattern for Worm on a Hook:

Materials:

190 yards of worsted weight yarn (I used just under 1 skein of Plymouth Yarn Encore Worsted Solids & Heathers)
J crochet hook (6.0 mm)
Tapestry Needle

Abbreviations:

BBL: Work in the Back Back Loop only. This is the loop BEHIND the back loop.

Top of work where you can see the work done in the BBL

1 – For HDC in BBL, YO, insert hook into BBL

2 – YO, pull up a loop

3 – YO, pull through all loops on hook


Ch: Chain
FHDC:
Foundation Half Double Crochet
HDC: Half Double Crochet
RSC: Raised Single Crochet (special stitch). After using this stitch in the Fritillary Scarf, I did some research to see if there was an official name for this stitch. While I found the stitch mentioned in a few places, I did not see it named anywhere else, so I’ve used the name from the Fritillary Scarf(if it was in American terms). This is similar to a back post stitch. Insert hook from back to front, under top two loops of stitch, then from front to back, under top two loops of next stitch. Hook will be around the post. YO, pull up a loop, YO, pull through both loops on hook.

Raised SC: 1 – Back to front under top loops of stitch

2 – Then from front to back under top loops of next stitch

3 – Your hook will now be around the post. Now YO, pull up a loop.

4 – YO, pull through both loops on hook, stitch is finished


RHDC: Raised Half Double Crochet (special stitch). Similar to the Raised Single Crochet, but this is the Half Double Crochet version. YO, insert hook from back to front, under top two loops of stitch, then from front to back, under top two loops of next stitch. Hook will be around the post. YO, pull up a loop, YO, pull through all loops on hook.
RSC2TOG: Raised Single Crochet 2 Together (special decrease stitch). Insert hook from back to front, under top two loops of stitch, then from front to back, under top two loops of next stitch. Hook will be around the post. YO, pull up a loop, insert hook from back to front, under top two loops of stitch, then from front to back, under top two loops of next stitch. Hook will be around the post. YO, pull up a loop,YO, pull through both loops on hook.
RHDC2TOG: Raised Half Double Crochet 2 Together (special decrease stitch). YO, insert hook from back to front, under top two loops of stitch, then from front to back, under top two loops of next stitch. Hook will be around the post. YO, pull up a loop, YO, insert hook from back to front, under top two loops of stitch, then from front to back, under top two loops of next stitch. Hook will be around the post. YO, pull up a loop,YO, pull through all loops on hook.
HDC2TOG in BBL: Half Double Crochet 2 Together in Back Back Loop

Notes:

This pattern is worked in the round, just keep going at the end of each row.

Pattern:

Round 1: Ch 2 (does not count as a stitch), 79 FHDC, then for final FHDC you will connect the foundation row. Make sure the foundation row is straight, put the two ends side by side, yo, insert hook into top two loops of chain of working side, then insert hook from the back to front of two loops of chain of the other side, yo, pull through both sides and pull up a loop, yo, pull through all loops on hook, you do not need to ss to connect to top part of stitch, just continue on with the next row. (80)

Round 2: RSC in each stitch around (80)

Round 3: RHDC in each stitch around (80)

Round 4: HDC in BBL of each stitch around (80)

Round 5-21: Repeat Rows 2-4 five more times

Round 22-23: Repeat Rows 2-3

Round 24: (8 HDC in BBL stitches, HDC2TOG in BBL) 8x (72)
**Confessional side note: I did not have 80 stitches by the time I got to this round. I had lost a few along the way. Count your stitches before you start round 24. If you do not have 80, do HDC2TOG at evenly spaced intervals to get to 72 stitches by the end of the round.

Round 25: (10 RSC, RSC2TOG) 6x (66)

Round 26: (9 RHDC, RHDC2TOG) 6x (60)

Round 27: (8 HDC in BBL, HDC2TOG in BBL) 6x (54)

Round 28: (7 RSC, RSC2TOG) 6x (48)

Round 29: (6 RHDC, RHDC2TOG) 6x (42)

Round 30: (5 HDC in BBL, HDC2TOG in BBL) 6x (36)

Round 31: (4 RSC, RSC2TOG) 6x (30)

Round 32: (3 RHDC, RHDC2TOG) 6x (24)

Round 33: (2 HDC in BBL, HDC2TOG in BBL) 6x, connect with a SS (18)

FO leaving a long tail

Weave the end through the last row of stitches and pull tight

Stitch together a few times and make sure secure

Weave in ends.

Please note this pattern is for personal use only. Please do not sell finished items from this pattern.

Some more pictures of Worm on a Hook:

Worm on a Hook - The Hat

Worm on a Hook Flat

Worm on a Hook - The Hat Closeup

Worm on a Hook – The Hat Closeup

Worm on a Hook - The Hat Top

Worm on a Hook – The Hat Top

Worm on a Hook - The Hat Front View

Worm on a Hook Front View

Worm on a Hook - The Hat Side View

Worm on a Hook Hat Side View

Free Pattern: Not a Brioche Infinity Scarf

Not a Brioche Infinity Scarf Wrapped

Not a Brioche Infinity Scarf

Wow, it’s been almost a year since I’ve posted. During that year I’ve been working a lot, still crocheting, and dabbling with the two stick thing (knitting).

I recently knit a Brioche Infinity Scarf and while I love the result, I felt like it took forever. To make it go faster, since  I was using an acrylic wool blend, I steamed the hell out of it to make it grow, which it did… but it also lost the squishiness that makes the Brioche Infinity Scarf so delicious.

I was thinking it was kind of like the ribbed strand of the Hooked Holla Infinity Scarf, but when I tried it out, it was not.

So after some more testing and swatching, I came up with the Not a Brioche Infinity Scarf pattern:

Materials:

725 yards of DK weight yarn (I used around 1.8 skeins of Jo-Ann Sensations Cuddle)
J crochet hook (6.0 mm)
Tapestry Needle

Abbreviations:

SS: Slip stitch

CH: Chain

FHDC: Foundation Half Double Crochet

FPHDC: Front Post Half Double Crochet

Notes:

This pattern is worked in the round, but you will be turning at the end of each row.

You will be working in post stitches for most of this pattern, but unlike how post stitches are frequently used, you will not be connecting the post stitches. This will result in a much more flexible fabric than you see when you connect the post stitches.

Not a Brioche Infinity Scarf ModelPattern:

Row 1: Ch 2, 179 FHDC,  then for final FHDC you will connect the foundation row. Make sure the foundation row is straight, put the two ends side by side, yo, insert hook into top two loops of chain of working side, then insert hook from the back to front of two loops of chain of the other side, yo, pull through both sides and pull up a loop, yo, pull through all loops on hook, connect with SS.

Row 2: Turn, Ch 1, FPHDC across, connect with SS

Row 3-40: Repeat Row 2

Finish off and weave in ends.

Finished scarf is 54″ long and 6″ wide not blocked. I did not block my scarf because I did not want to lose the squishiness.

Variations:

Longer or shorter scarf: This foundation row is aprox. 60″ long and will shrink to 54″ in the final scarf. If you want a longer scarf, your foundation row should be 10% longer than your desired finished length.

Worsted Weight Not a Brioche Infinity Scarf

Worsted Weight Not a Brioche Infinity Scarf

Worsted Weight Yarn: I have also made one in Patons Classic Wool which took around 2.5 skeins (525 yds), using a K hook and did 142 stitches for the foundation row. It was around a 49″ foundation row and I did 32 rows. The final scarf was very dense so I steamed and steamed it to open it up. It’s now around the same length and width as the one I made in Cuddle. It is a thicker scarf though and the DK weight yarn has more drape.

Kid’s Version: I made one for my son in Red Heart Super Saver. He’s been having issues tying his scarf recently and the infinity scarf is easier for him to put on without choking himself. For his scarf I used a K hook, did a foundation row of 140 stitches, 11 rows, and did not block it.

Kid's Two Tone Scarf

Kid’s Two Tone Scarf

Two Tone: I made my son’s scarf two tone, one side Royal Blue and one side Lighter Blue. I alternated colors on every other row. At the end of the rows I did the join with SS and Ch 1 with both colors before dropping one and starting the next. The seam isn’t spectacular, but it beats weaving in all those ends.

Two Tone Not a Brioche Infinity Scarf

Two Tone Not a Brioche Infinity Scarf


Free Pattern: Sugared Ribs – An Infinity Scarf

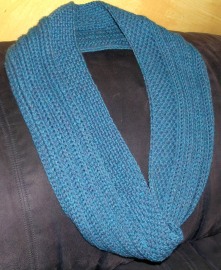
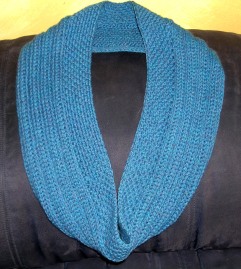
Sugared Ribs - An Infinity Scarf

Sugared Ribs – An Infinity Scarf

I finally gave Kristen Hein Strohm’s Fritillary Scarf a shot for Christmas presents. Reading through it made no sense, but when I finally sat down to make it, it worked out fine and made a gorgeous infinity scarf. I would highly recommend the pattern from Inside Crochet’s August 2011 issue available through Yudu. The pattern is for a flat scarf, but works very well in the round.

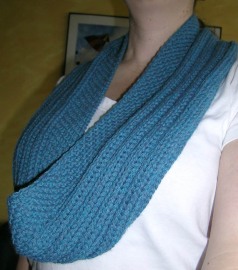
Sugared Ribs Front View

Sugared Ribs Side View


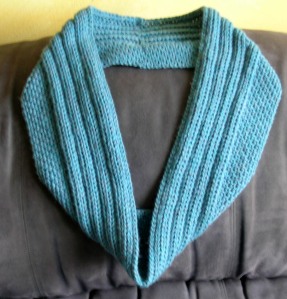
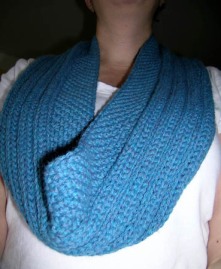
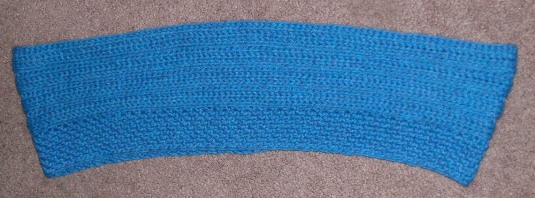
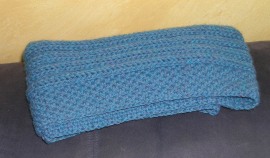
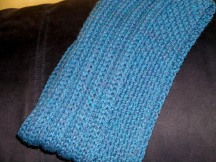
So while I was making these, I kept thinking how great it would work as just a ribbed cowl. New Year’s Eve I kept playing around with stitches and stitch patterns and while I wasn’t convinced just a ribbed cowl was the way to go, by New Year’s Day, my new infinity scarf Sugared Ribs was complete and I totally love how it came out. Sugared Ribs starts off with 4 shallow ribs (or faux ribs depending on your point of view), then ends with a few rows of seed stitch. I love ribbing and am always up to try a new crochet method. I really like how this ribbing came out. The rib rows take a while, but you’ll sprint through the final rows of seed stitch and the combo works great together.


So here’s my New Year’s baby, Sugared Ribs – An Infinity Scarf:

Materials:

280 yards of worsted weight yarn (I used around 1.3 skeins of Berroco’s Vintage)
J crochet hook (6.0 mm)
Tapestry Needle

Abbreviations:

CH: Chain
CHSP: Chain Space
BBL: Work in the Back Back Loop only. This is the loop BEHIND the back loop.

Top of work where you can see the work done in the BBL


1 – For HDC in BBL, YO, insert hook into BBL


2 – YO, pull up a loop


3 – YO, pull through all loops on hook


FHDC: Foundation Half Double Crochet
HDC: Half Double Crochet
RSC: Raised Single Crochet (special stitch). After using this stitch in the Fritillary Scarf, I did some research to see if there was an official name for this stitch. While I found the stitch mentioned in a few places, I did not see it named anywhere else, so I’ve used the name from the Fritillary Scarf(if it was in American terms). This is similar to a back post stitch. Insert hook from back to front, under top two loops of stitch, then from front to back, under top two loops of next stitch. Hook will be around the post. YO, pull up a loop, YO, pull through both loops on hook.

Raised SC: 1 – Back to front under top loops of stitch


2 – Then from front to back under top loops of next stitch


3 – Your hook will now be around the post. Now YO, pull up a loop.


4 – YO, pull through both loops on hook, stitch is finished


RHDC: Raised Half Double Crochet (special stitch). Similar to the Raised Single Crochet, but this is the Half Double Crochet version. YO, insert hook from back to front, under top two loops of stitch, then from front to back, under top two loops of next stitch. Hook will be around the post. YO, pull up a loop, YO, pull through all loops on hook.
SC: Single Crochet

Video tutorials for the special stitches used in this pattern can now be found on the Crochet Video Tutorial page.

Notes:

This pattern is worked in the round, just keep going at the end of each row.

Pattern:

Row 1: Ch 3 (counts as first HDC), 173 FHDC, then for final FHDC you will connect the foundation row. Make sure the foundation row is straight, put the two ends side by side, yo, insert hook into top two loops of chain of working side, then insert hook from the back to front of two loops of chain of the other side, yo, pull through both sides and pull up a loop, yo, pull through all loops on hook, you do not need to ss to connect to top part of stitch, just continue on with the next row. (175)

Row 2: RSC in each stitch around (175)

Row 3: RHDC in each stitch around (175)

Row 4: HDC in BBL of each stitch around (175)

Rows 5-10: Repeat Rows 2-4 two more times

Rows 11-12: Repeat Rows 2 and 3

Row 13: SC in BBL of each stitch around (175)

Row 14: SC, CH 1 (skip 1 SC) (175)

Row 15: SC in CHSP, CH 1 (skip SC) (175)

Rows 16-22: Repeat Row 15

Weave in ends.

Variations:

Only want the ribs (aka Sugar Free Ribs)? Repeat rows 2-4 until it’s as wide as you want it. you may want to end with a row of SS or SC.

This length is long enough to double, but you can make it shorter or longer, just use an odd number of stitches.

Please note this pattern is for personal use only. Please do not sell finished items from this pattern.
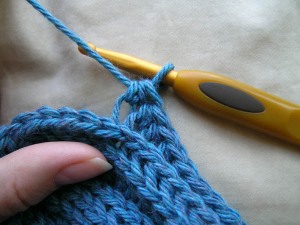
Some more pictures of Sugared Ribs:


Categories